Android Authority , is a famous website provides information regarding Android to the world.
Also,it provides device reviews,latest applications and some information about the companies strategy and rumors on the future releases.
Most famous of all is the Sunday giveaway,which gives a chance to the people or winning a free smartphone through a ticket contest or so. Yea,you read it right!,a free smartphone.
This week you can win a brand new Nexus 5 16GB (Black Colour) . Nexus 5 is a over-whelming smartphone with high-end specs at a decent price of 28,500INR .It has has 2.23GHz Snapdragon 800 processor with 2GB of RAM with 4G(LTE) connectivity . The 8MP snapper with flash and OIS performs well ,the front facing camera stands at 1.3MP which is capable of recording 1080p videos.The two storage variants are 16GB and 32GB .It contains a True HD IPS+ with 1920x1080 resolution at 445ppi and protection of Gorilla Glass 3.The GPU is Adreno 330, and it was the first-ever device to run Android 4.4 Kitkat .
Here is a list of general rules and regulations provided as by Android Authority-


So,what are you waiting for head over to the thread .Results will be announced on Sunday in next post .
GOOD LUCK!
Link to the post-Click here
Source-Android Authority
[Note-I am not affiliated to Android Authority in any way]
Nexus 5 -

Image Souce-expertreviews.co.uk
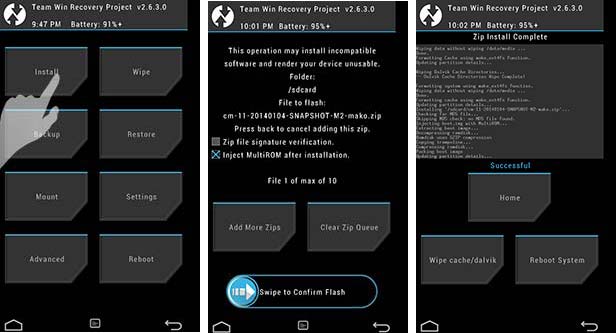
Installing a custom recovery on your Android smartphone lets you explore the all-new world of flashing custom ROMs,and tweak your phone's performance by installing a custom Kernel on your device .It's not limited upto this extent , as flashing a recovery let's you install various mods onto your phone like the Bravia Engine from SONY and highly famous Beats Audio for music lovers .
So,in today's tutorial I will help you install a custom recovery onto your Moto G . Rooting guide has been given in last tutorial
Recalling,Moto G is powered by a 1GB RAM,with a quad-core 1.2GHz Snapdragon 400 processor with a HD display at 329ppi and Gorilla Glass 3.It has a 5MP snapper with HD video recording.
Let's begin-
1.Download ADB and fastboot (500kb Credit-MXROOTROM) from here
2.Select and download your recovery and put in the same folder where you extracted ADB and Fastoot
CWM-Here
CWM Touch-Here
TWRP-Here
3.Open Terminal Window-Shift+Right Click
4.Type code
fastboot flash recovery recovery.img
[NOTE-I am not responsible for Bricked devices and dead SD Cards]
Source-MXROOTROM,XDA-Developers(a1Pha)
1.TWRP-Source Google Images

2.CWM-Google Images
Moto X,quite popular and bought for it's features rather than specs , primarily the always-on listening which allowed the users to control their smartphones by voice commands and the other one , active display which when the phone is listed displays the notifications on the lockscreen
The always-on listening worked out due to an additional co-processor , which also helped in saving battery by not using the main cores of the device
This feature was ported to a Nexus 5 which contains a Snapdragon 800 which contains an dedicated signal processing core that makes it to work out. Guillaume Lesniak from OmniROM was first to demo the capability in a short proof made by him in his Google+ page .In the video, he unlocked his Nexus 5 using two words that were "Hey Snapdragon" . It is currently not released due to legal restrictions on reverse engineering and releasing source code for public availability .
Nexus 5 infact Snapdragon 800 has a low-power DSP for language processing that can be used to copy the always-on listening features by a firmware upgrade and it might also be introduced by Google into it's next Android version.
Guillaume Lesniak aims to provide these features to open community as Android is an open source project after all legal settlements and when it's more stable

SOURCE-XDA Developers,AndroidPIT
Moto G recently launched it's low budget flagship Android powered smartphone in the market.Yes,It is the Moto G.
Motorola G or Moto G,is the compact version of Moto X,which boasts a 1 Gigabyte of RAM, 4 cores each clocked at 1.2 GHz and runs a Snapdragon 400 processor which is very unlike the phones that run MediaTek processors available in the market . Camera snaps at 5MP .Display includes a 4.5-inch 1280x720 HD display at 329ppi and a protection of Gorilla Glass 3;at an unbelieveable price of 12,600 INR for 8GB and 13,999 INR for 16GB storage variants.
So let's begin with today's tutorial-
1.Download the Superboot.zip (click),and extract it somewhere on Desktop or a folder.
2.Put your device in bootloader mode (Switch the phone off and press and hold Volume(-) and Power key
3.Connect phone to your PC
4.->Windows users-Run 'superuser-windows.bat' as Administrator
->MAC - Open a terminal window to the directory containing the files, and type 'chmod +x superboot-mac.sh' followed by 'sudo ./superboot-mac.sh'
->LINUX - Open a terminal window to the directory containing the files, and type 'chmod +x superboot- linux.sh' followed by 'sudo ./superboot-linux.sh

SOURCE-MoDaCo (Paul O' Brien)
